SpeechPulse Help
Contents
- SpeechPulse demo
- How to download speech models
- How to download NVIDIA CUDA GPU libraries (Windows)
- How to add OpenAI-compatible speech APIs
- How to add OpenAI-compatible large language model (LLM) APIs
- Controls overview
- Training New Words
- System Audio Mode
- AI Templates
- Clipboard Processing
- Speech Profiles
- How to update SpeechPulse (Windows)
- How to update SpeechPulse (Windows) from versions 4.x.x or older
- Basic dictation
- Voice commands
- Hotkeys
- Voice Hotkeys
- Custom Vocabularies
- Mappings
- Text Inserter
- SpeechPulse Editor
- Punctuation Modes
- Prompts
- Dictating numbers in the manual punctuation mode
- How to get better accuracy
- Frequently asked questions:
- How to fix the random text generation?
- Which microphones work well with SpeechPulse?
- Why does SpeechPulse sometimes take longer than usual to transcribe speech?
- How to control capitalization and spacing in the manual punctuation mode?
- How to fix automatic capitalization and spacing?
- How to fix the missing SpeechPulse taskbar icon on Windows?
* Real-time processing mode and Type mode currently don't support Windows 11 Notepad (they work fine on Windows 10 Notepad). Please use Paste mode when you dictate to Windows 11 Notepad.
* Automatic spelling and grammar correction of text editors can interfere with the real-time processing mode, causing incorrect transcription. Please disable any autocorrection feature on the target applications when using the real-time mode.
* SpeechPulse (Windows) runs in non-administrator mode by default and will fail to type into any of the apps that you run in administrator mode. If that's the case, you can run SpeechPulse in administrator mode to fix the issue.
* In order to reduce the installer size, SpeechPulse installer only includes the English (base) model. You can download larger models using the built-in model downloader.
* On Windows, we also recommend you run medium and large models on an NVIDIA GPU for live dictation. These models can be too slow for live dictation on a CPU.
* For example, the Multi (large) model takes less than 2 seconds to transcribe the sentence "Speech recognition is much faster than typing." on an NVIDIA RTX 3060 GPU. The same sentence takes 16 seconds on an Intel Core i5-12400 CPU.
* Minimum NVIDIA GPU VRAM size for Multi (large) model: 4 GB
* You can download the required NVIDIA CUDA libraries using the built-in library downloader.
* You can use Prompts to control SpeechPulse's text output in Auto-punctuation mode. SpeechPulse will consider the prompt to determine the output format, style, punctuation, capitalization, etc. Experiment with different prompts to get the best results.
* On Windows, if you enable background loading under "Settings->Options->General Settings" and can't find the SpeechPulse system tray icon after that, you can fix it by following the instructions here.
SpeechPulse demo
How to download speech models
For better accuracy and multi-language support, you can download additional speech models using the built-in model downloader.
How to download NVIDIA CUDA GPU libraries (Windows)
GPU mode requires an NVIDIA GPU. You also need to download the GPU libraries using the built-in library downloader.
Note: Do not download the GPU libraries if your computer doesn't have an NVIDIA GPU.
How to add OpenAI-compatible speech APIs
You can add OpenAI-compatible speech APIs to SpeechPulse using the "Speech model" dropdown. Any API that is compatible with the OpenAI speech API is supported.
OpenAI Whisper API:
- API Name: Whisper
- Base URL: https://api.openai.com/v1
- Model Name: whisper-1
- API KEY: Your API Key
OpenAI GPT-4o Transcribe API:
- API Name: GPT-4o Transcribe
- Base URL: https://api.openai.com/v1
- Model Name: gpt-4o-transcribe
- API KEY: Your API Key
OpenAI GPT-4o mini Transcribe API:
- API Name: GPT-4o mini Transcribe
- Base URL: https://api.openai.com/v1
- Model Name: gpt-4o-mini-transcribe
- API KEY: Your API Key
Groq Whisper Large V3 API:
- API Name: Groq
- Base URL: https://api.groq.com/openai/v1
- Model Name: whisper-large-v3
- API KEY: Your API Key
Microsoft Azure Whisper API:
- API Name: Azure Whisper
- Base URL (Azure endpoint): https://{your Azure resource}.cognitiveservices.azure.com
- Model Name: whisper
- API KEY: Your Azure API Key
- API Version: Azure API Version (e.g., 2024-06-01)
- Deployment Name: Can be the same as the model name or a different identifier if configured (e.g., whisper)
Microsoft Azure gpt-4o-transcribe API:
- API Name: Azure GPT-4o Transcribe
- Base URL (Azure endpoint): https://{your Azure resource}.cognitiveservices.azure.com
- Model Name: gpt-4o-transcribe
- API KEY: Your Azure API Key
- API Version: Azure API Version (e.g., 2025-03-01-preview)
- Deployment Name: Can be the same as the model name or a different identifier if configured (e.g., gpt-4o-transcribe)
Microsoft Azure gpt-4o-mini-transcribe API:
- API Name: Azure GPT-4o mini Transcribe
- Base URL (Azure endpoint): https://{your Azure resource}.cognitiveservices.azure.com
- Model Name: gpt-4o-mini-transcribe
- API KEY: Your Azure API Key
- API Version: Azure API Version (e.g., 2025-03-01-preview)
- Deployment Name: Can be the same as the model name or a different identifier if configured (e.g., gpt-4o-mini-transcribe)
For any other OpenAI-compatible speech API, please refer to the API provider's documentation for the correct settings.
How to add OpenAI-compatible large language model (LLM) APIs
You can add OpenAI-compatible LLM APIs to SpeechPulse using the "Language model" dropdown. Any API that is compatible with the OpenAI API is supported.
OpenAI LLM API:
- API Name: OpenAI
- Base URL: https://api.openai.com/v1
- API KEY: Your API Key
- Select auto model detection
Groq LLM API:
- API Name: Groq
- Base URL: https://api.groq.com/openai/v1
- API KEY: Your API Key
- Select auto model detection
Google Gemini LLM API:
- API Name: Gemini
- Base URL: https://generativelanguage.googleapis.com/v1beta/openai/
- API KEY: Your API Key
- Select auto model detection
Microsoft Azure LLM API:
- API Name: Azure
- Base URL (Azure endpoint): https://{your Azure resource}.cognitiveservices.azure.com
- API KEY: Your Azure API Key
- API Version: Azure API Version (e.g., 2024-12-01-preview)
- Select "Manually enter AI model names"
- Enter available model (or deployment) names one by one: (e.g., gpt-4.1)
For any other OpenAI-compatible LLM API, please refer to the API provider's documentation for the correct settings.
Controls Overview
Training New Words
You can train new words to SpeechPulse using the training feature. Training is currently supported only for English, German, French, Italian, Spanish, Dutch, Portuguese, Polish, Russian, Hungarian, Finnish, Swedish, Greek, Ukrainian, Romanian, Catalan, Arabic, and Turkish languages.
System Audio Mode
System Audio Mode supports real-time transcription of mic and system audio to an internal editor (no mouse focus required). It also supports recording mic and system audio to WAV files.
You can use the System Audio Mode to live transcribe/translate any audio/video content you playback on your computer.
With speaker diarization enabled, System Audio Mode can transcribe your online interviews/meetings with the correct speaker names.
You can also select a set of saved speakers as the active speakers for a session. SpeechPulse will then limit the speaker detection to the selected active speaker list for better diarization accuracy.
You can customize the System Audio Mode via "Settings->Options->General Settings".
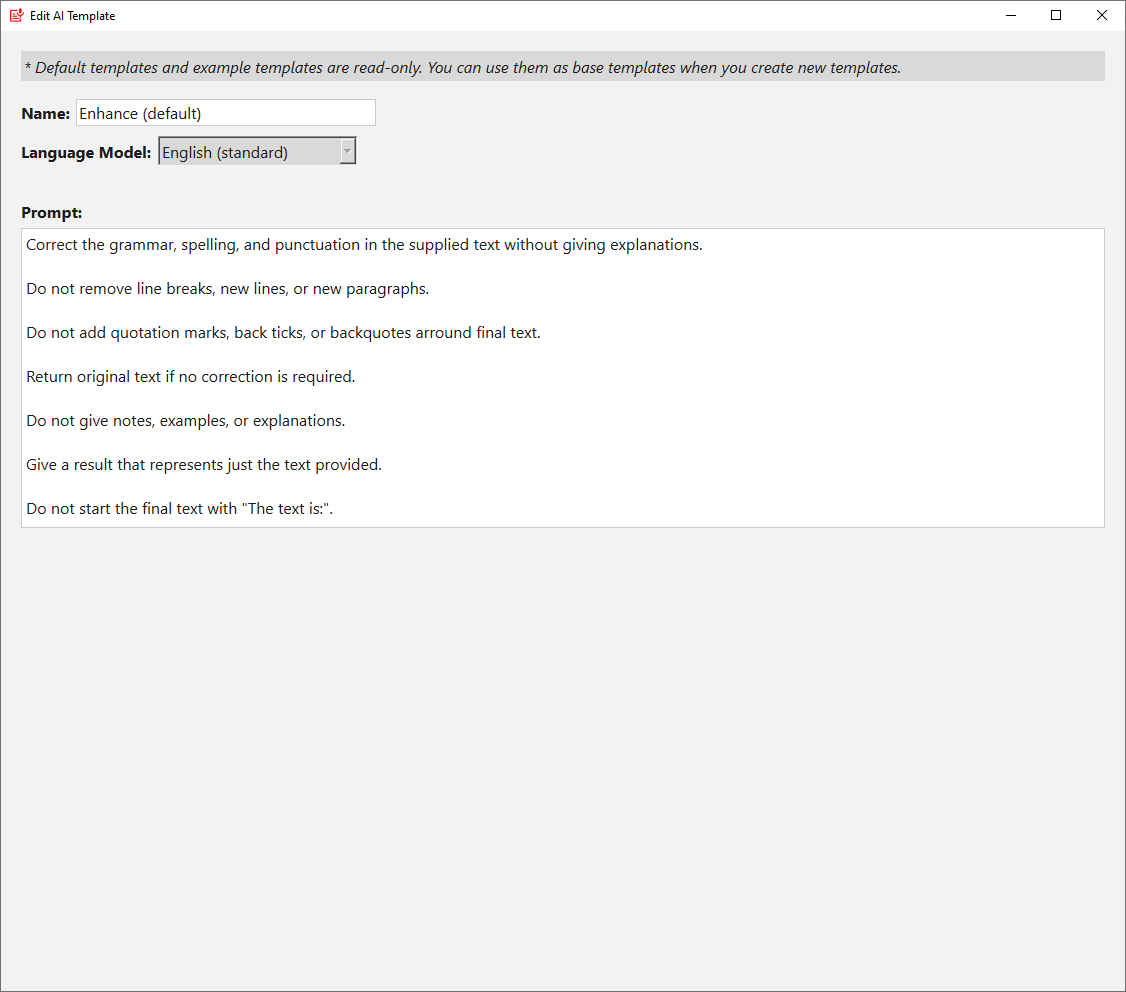
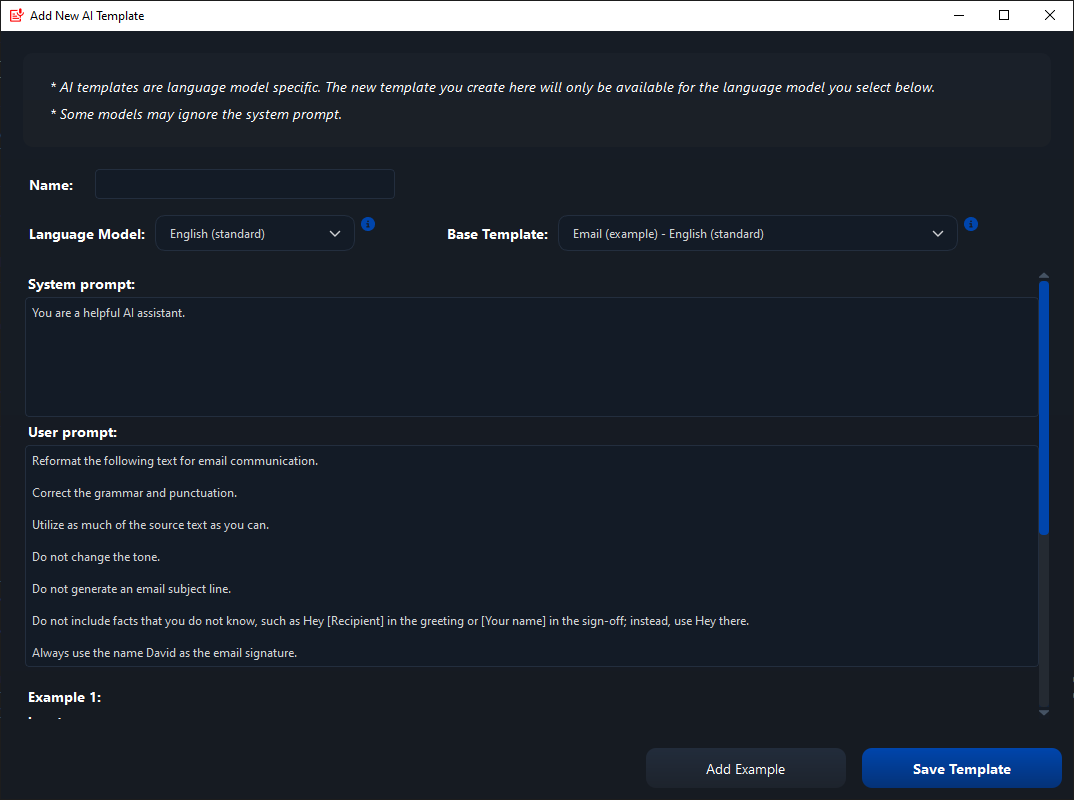
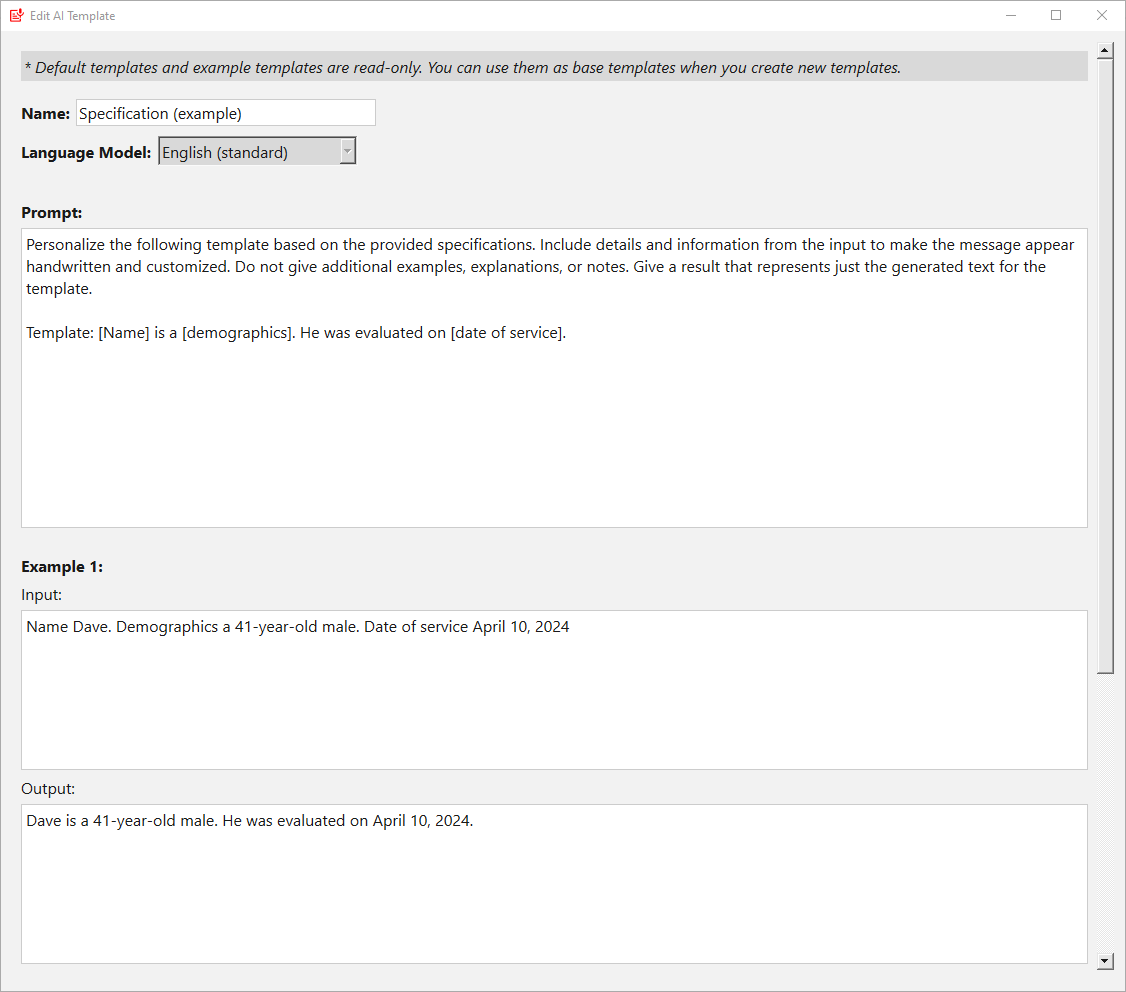
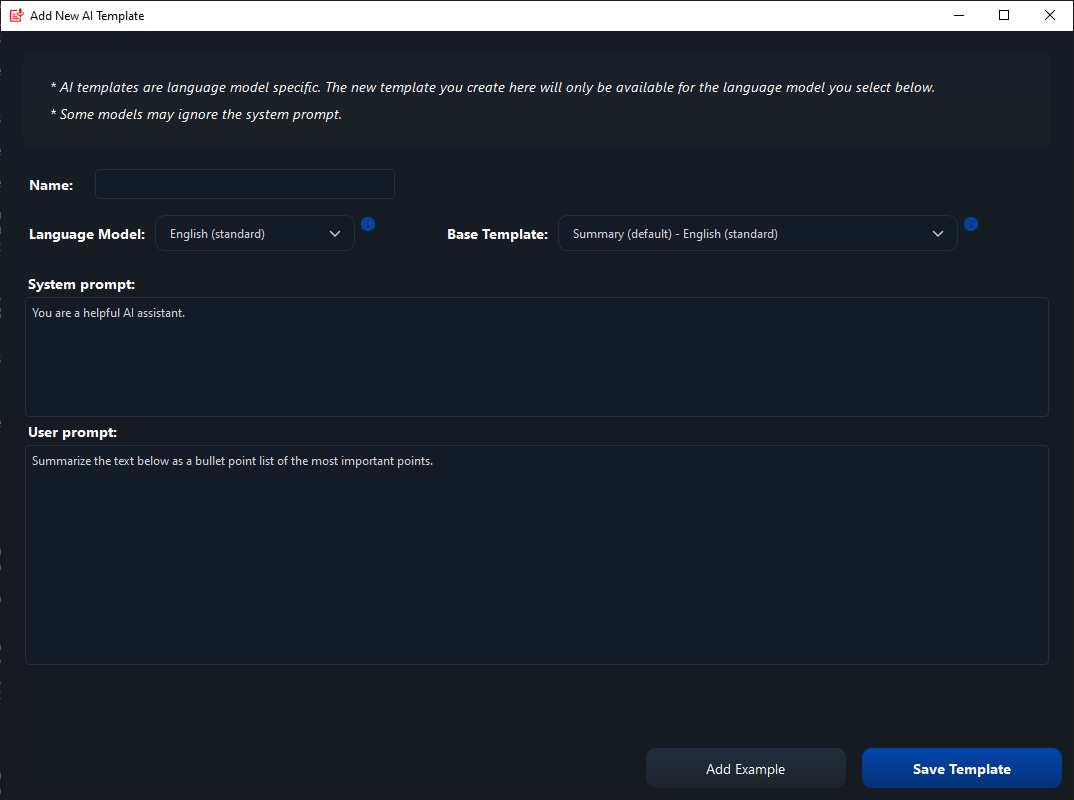
AI Templates
SpeechPulse supports real-time text formatting using AI language models and APIs. You can create AI templates for grammar, spelling, and punctuation correction, summarizing text, formatting text for Email, notes, etc.
You can add new AI language models and APIs to SpeechPulse using the "Language model" dropdown.
You can customize the AI Templates via "Settings->Options->AI Templates" or using the edit template and add new template buttons in the main SpeechPulse UI.
When prompting AI models, try to be specific, descriptive, and as detailed as possible about the desired context, outcome, length, format, style, etc.
Experiment with different prompts until you get the desired output.
You can also give example input/outputs in AI Templates for better results. Language models will use the given examples to tailor the output to the desired format.
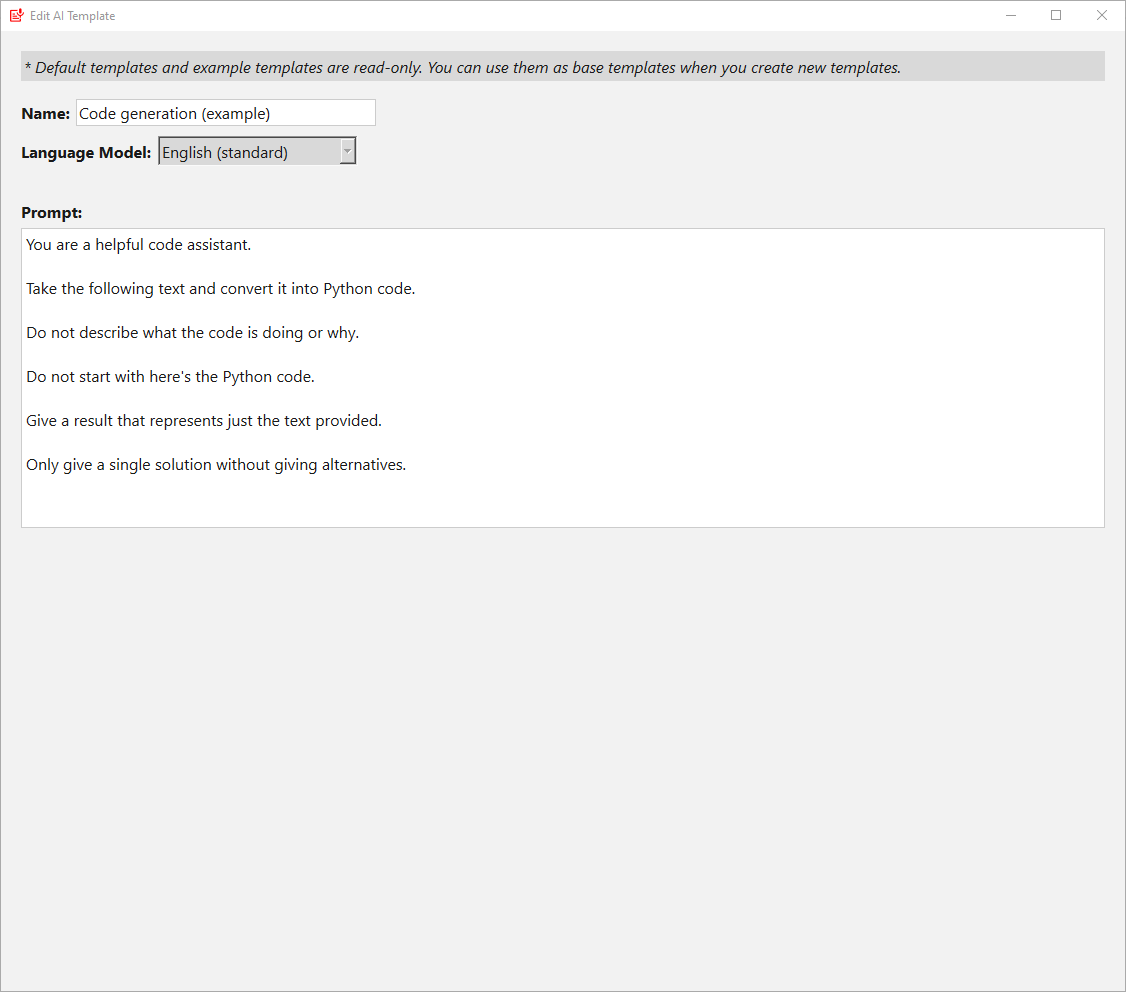
Several default templates and example templates included with SpeechPulse are listed below.
Text enhancing
Email formatting
Specification
Summarization
Code generation
Clipboard Processing
Specification
Summarization
Code generation
Clipboard Processing
Code generation
Clipboard Processing
SpeechPulse can process the currently copied text in the clipboard using AI language models.
First, use CTRL+C to copy the text to the clipboard. Then, start clipboard processing using the clipboard processing hotkey.
SpeechPulse will then process the clipboard text using the currently selected AI language model and AI template. It will then insert the formatted text into the text input area at the current cursor position.
You can configure the clipboard processing hotkey via "Settings->Options->Hotkeys".
Speech Profiles
If you are in a noisy environment and SpeechPulse generates random text, you can use the "Speech Profiles" feature to add a new speech profile that only detects your own voice.
If multiple users share the same SpeechPulse installation, each user can create a separate speech profile sensitive to their voice.
The speech profiles feature can ignore noisy background audio and eliminate text hallucinations. However, it can't separate speech from multiple active speakers.
How to update SpeechPulse (Windows) to the latest version
You can download the latest version of SpeechPulse from here. Then double-click the downloaded exe file to update SpeechPulse.
You don't need to uninstall the older version. SpeechPulse will automatically detect the older installation and update it.
How to update SpeechPulse (Windows) to the latest version from versions 4.x.x or older
Please follow these steps to update SpeechPulse (Windows) to the latest version from versions 4.x.x or older:
- Uninstall the older SpeechPulse version.
- Completely delete the SpeechPulse installation folder and all its contents, including downloaded models and CUDA libraries (e.g. delete "C:\Program Files\SpeechPulse" folder).
- Download the latest SpeechPulse version from here.
- Install the latest version.
- Only for users with NVIDIA GPUs -> Use the built-in GPU library downloader to download the latest CUDA libraries (switch to the GPU mode (using the CPU/GPU dropdown) to open the GPU library downloader).
- Use the built-in model downloader to download speech models (select "add more models" in the Speech model dropdown to open the model downloader).
Basic dictation
- Open your favorite text editor (Notepad, Wordpad, MS Word, Google docs etc.).
- Press the SpeechPulse Start button to start voice typing.
- Put the mouse cursor where you wish to insert text in your text editor.
- Start speaking in your natural voice. Try to speak in complete sentences for better accuracy.
Voice commands
You can refer to the voice command guide to get the full list of supported voice commands.
The list of active voice commands changes depending on the punctuation mode and whether you are dictating to the built-in editor or to an external application.
Hotkeys
SpeechPulse also supports hotkeys. You can enable and configure hotkeys in the settings menu.
Voice Hotkeys
You can use Custom Voice Hotkeys to trigger keyboard shortcuts with your voice. Simply enter the voice command and corresponding keyboard shortcut, and SpeechPulse will trigger the hotkey when it detects the voice command.
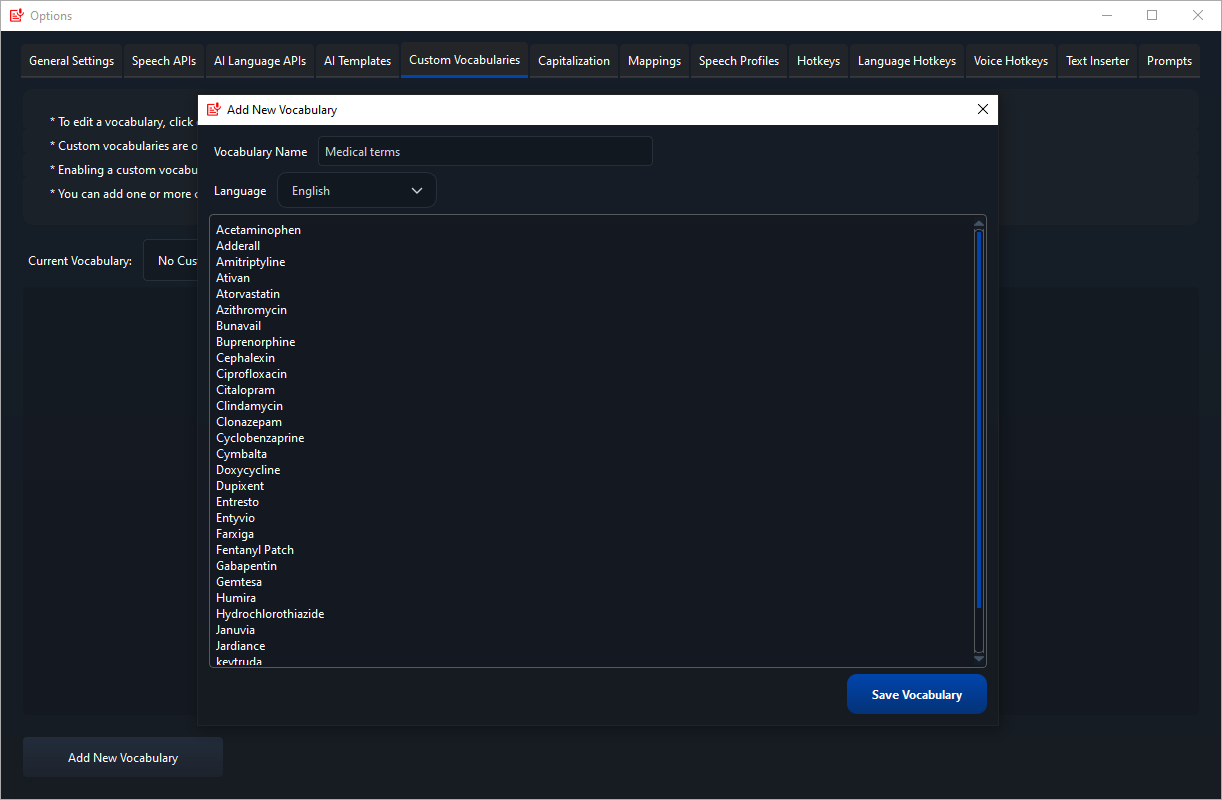
Custom Vocabularies
You can add new words and phrases to SpeechPulse via "Settings->Options->Custom Vocabularies".
Custom vocabularies are only supported in the Auto-punctuation mode.
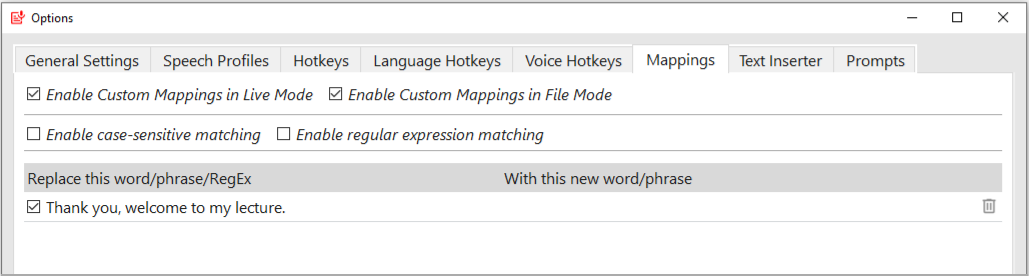
Mappings
You can use custom word/phrase mappings to replace SpeechPulse's text output with your own custom words and phrases.
For example, you can replace the phrase "speech pulse" with "SpeechPulse" using the custom mappings feature.
Similarly, you can remove unwanted words/phrases by replacing them with an empty string.
The mappings feature also supports regular expressions for wildcard matching. For regular expression matching, you need to enter the regex pattern as the search string. All the common regex patterns are supported.
For example, you can use the following mapping to replace "gray color", "grey color", "gray colour", or "grey colour" with the new phrase "Gray color".
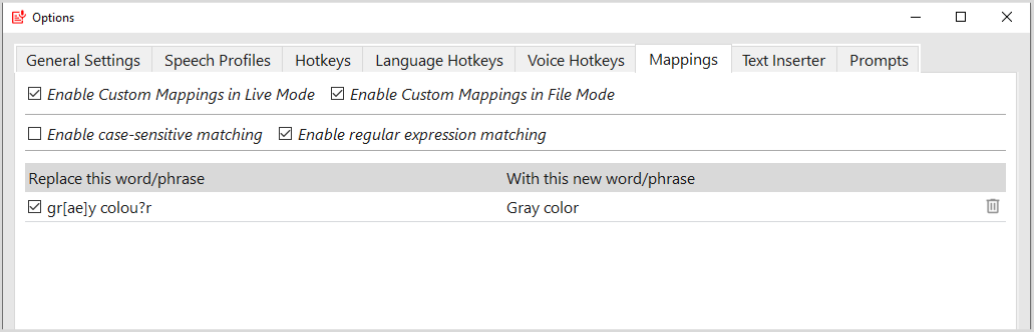
For case-sensitive regex matching, you need to enable the case-sensitivity option.
Custom mappings can be enabled for both Live mode and File Mode.
Text Inserter
You can use the Text Inserter to insert frequently used text snippets with voice commands. Simply enter the voice command and corresponding text snippet, and SpeechPulse will paste the text snippet when it detects the voice command.
Text Inserter supports both plain text and rich text. So you can insert text with URLs and other formatting information using the Text Inserter.
SpeechPulse Editor
You can open the SpeechPulse editor using a customizable hotkey or with the voice command "Open editor".
The editor can automatically insert text into other applications.
Place the cursor into the text field of the target application (e.g., Notepad, MS Word) and open the editor using the hotkey or voice command. The editor will indicate the target app name in the title bar.
Once you have completed dictating, say "Transfer text" or press the "Transfer Text" button to transfer the text to the target app.
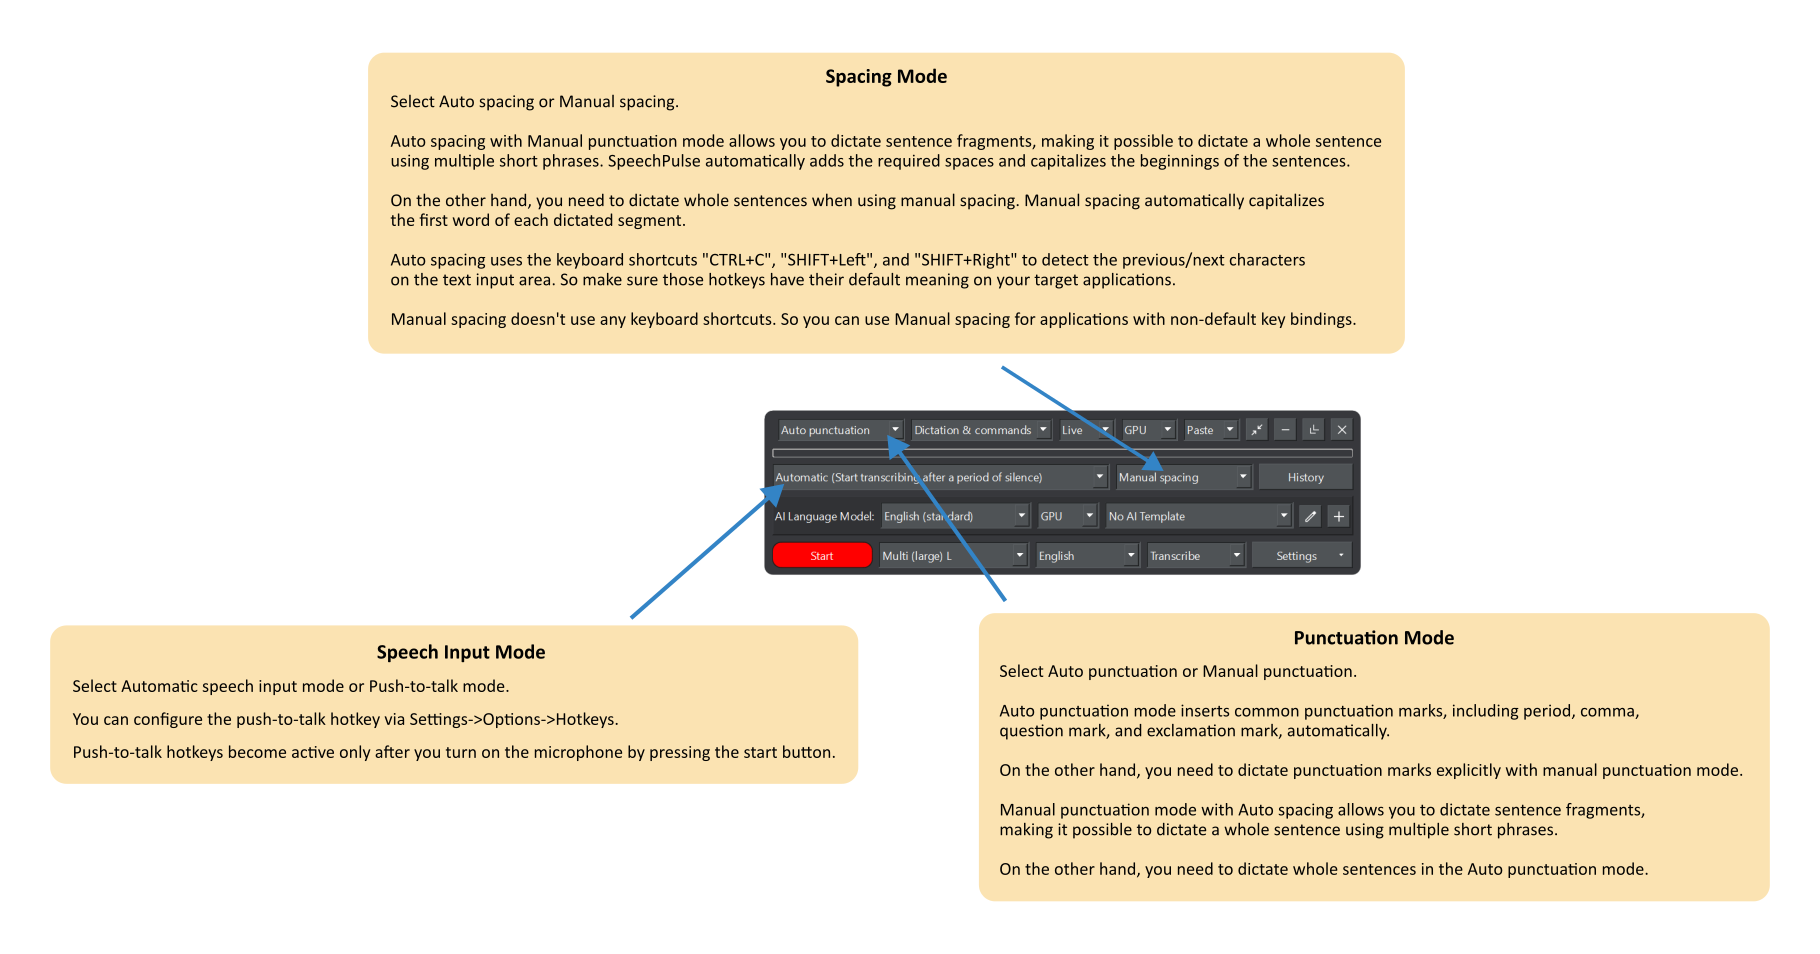
Punctuation Modes
SpeechPulse supports two punctuation modes: Auto punctuation and Manual punctuation.
Auto punctuation
Auto punctuation mode inserts common punctuation marks, including period, comma, question mark, and exclamation mark, automatically.
It also supports "new line" and "new paragraph" commands within a continuous speech segment.
Manual punctuation
With manual punctuation mode, you need to dictate punctuation marks explicitly.
Manual punctuation mode also supports "new line" and "new paragraph" commands within a continuous speech segment.
You can refer to the voice command guide to get the full list of supported voice commands.
* Manual punctuation is currently supported only for English, German, French, Spanish, Italian, Dutch, Portuguese, Danish, Russian, Polish, Swedish, Hungarian, and Turkish languages.
Prompts
You can use Prompts to control SpeechPulse's text output in Auto-punctuation mode. Several use cases are as follows:
Fix the issues of missing punctuation. Example prompt: "Hello, welcome to my lecture."

Correct the spelling and capitalization. Example prompt: "SpeechPulse, GPT, RTX, Electronic Arts"
You can add words to SpeechPulse's vocabulary by listing the words in a prompt. Example prompt: "ZyntriQix, Digique Plus, CynapseFive, VortiQore V8, EchoNix Array, OrbitalLink Seven, DigiFractal Matrix"
* Prompts are only supported in the Auto punctuation mode.
* Prompts have a maximum length of 200 tokens. SpeechPulse only considers the last 200 tokens of a prompt. Both words and punctuation symbols are considered as tokens.
Dictating numbers in the manual punctuation mode
You can dictate most numbers the way you normally say them. If you would like to see more formatting, please submit a feature request.
Whole numbers
- 342 -> Three hundred and forty-two
- 4,567 -> Four thousand five hundred and sixty-seven
- 873,120 -> Eight hundred and seventy three thousand one hundred and twenty
- 7,340,200 -> Seven million three hundred and forty thousand two hundred
Decimals
- 0.023 -> Zero point zero two three (or Point zero two three)
- 13.56 -> Thirteen point five six
Fractions
- 1/2 -> One half
- 3/4 -> Three fourths (or Three quarters)
- 121/645 -> One twenty one over six forty five (or One twenty one divided by six forty five)
- 6 4/5 -> Six and four fifths
Phone numbers
- 917-642-8073 -> Nine one seven six four two eight zero seven three
Dates
- May 18, 2024 -> May eighteen two thousand twenty four
Time
- 10:30 a.m. -> Ten thirty a m
- 10:30 p.m. -> Ten thirty p m
Currency
- $20 -> Twenty dollars
- $20.50 -> Twenty dollars and fifty cents
- £20 -> Twenty pounds
- £20.50 -> Twenty pounds fifty (or Twenty pounds and fifty pence)
- €20 -> Twenty euros
- €20.50 -> Twenty euros and fifty cents
Percentages
- 25% -> Twenty five percent
- 25.6% -> Twenty five point six percent
How to get better accuracy
1) Try to reduce the background noise
SpeechPulse has decent accuracy even with moderate background noise. However, for the best accuracy and lowest latency, you should try to lower the background noise as much as possible.
2) Try to speak in complete sentences
Short phrases can confuse the AI language models, causing poor accuracy. So try to speak in complete sentences as much as possible.
3) Use a headset microphone instead of a PC/laptop microphone
PC/laptop microphones can capture faraway sounds/noises causing random text hallucinations in SpeechPulse. So it is better to use a headset microphone for better accuracy and fewer hallucinations.
4) Use a larger language model
Larger language models have better accuracy. They also work well under background noise. However, larger models require more RAM and have higher latencies.
Frequently asked questions:
How to fix the random text generation?
The random text generation issue can happen for several reasons. This is called text hallucinations in AI terms.
The most common issue is background noise (especially faint human/animal voices). When AI language models get faint voices (low volume) they tend to incorrectly transcribe them to random text phrases (like "Thank you.", "Hello, welcome to my lecture." etc.). Sometimes the models will even repeat the same incorrect phrase multiple times in a loop.
You can try the following to fix the text hallucination issue:
- Try the Push-to-talk mode. It can reduce text hallucinations by preventing unintended pauses.
- If you are using a PC/USB/laptop microphone, try SpeechPulse with a headset microphone. Headset microphones only pick up your voice and won't capture faraway background noise.
- If you notice random text generation even if you are not talking, you can add a new speech profile to make SpeechPulse sensitive to only your voice.
- You can also try dictating slightly louder so models can differentiate voice from background noise.
- If possible, try to lower the background noise (try dictating in a quieter location).
- Noise cancellation can distort the audio signal and cause issues like text hallucination. So try disabling the noise cancellation of your noise-canceling microphone. (also try disabling any noise-canceling software on your PC)
- Make sure the microphone has a sufficient volume. Too quiet microphones can cause text hallucinations. If the microphone has a volume/gain control, increase the volume.
- Make sure the microphone is not clipping your speech. Try reducing the microphone volume/gain if it is too high.
- Different microphones have different pickup patterns and distances. Make sure to place the microphone at a correct distance from your mouth. If the microphone is not in the optimal position, it can degrade the speech signal and cause text hallucinations.
- If all else fails, try SpeechPulse with a different microphone.
- You can also use the mappings feature to automatically remove common text hallucinations. Simply use a blank replacement string in your mappings entry. You can also use a regular expression to replace all hallucinations of a specific pattern.
Which microphones work well with SpeechPulse?
SpeechPulse is compatible with any PC/USB/laptop/headset microphone. However, headset microphones usually work better as they only pick up your voice and won't capture too much background noise.
Also, make sure to place the microphone at a correct distance from your mouth. If the microphone is not in the optimal position, it can degrade the speech signal and lower the transcription accuracy.
Some noise-canceling microphones can distort the speech signal and cause issues like text hallucination and poor transcription accuracy. In that case, try disabling the DSP noise-cancellation of your microphone.
Also, make sure your microphone has a sufficient volume. SpeechPulse can take longer to transcribe your speech if the mic volume is too low. It can also cause poor transcription accuracy and text hallucinations.
Why does SpeechPulse sometimes take longer than usual to transcribe speech?
SpeechPulse can sometimes take longer than usual to transcribe your speech for several reasons.
The transcription can take longer if the speech signal is of poor quality. For example, if you place your microphone far away from you, the speech signal will degrade, causing SpeechPulse to try the transcription several times with different internal settings. This repeated processing can significantly increase the total processing time you experience. The same issue can arise if your microphone has a very low volume.
You can try a headset microphone instead of a PC/USB/laptop microphone to prevent longer transcription times. Also, make sure your microphone has sufficient volume and place the mic at a proper distance from your mouth.
Too much background noise can also cause SpeechPulse to take longer than usual to complete the transcription. Faint human/animal voices can confuse AI models, causing them to repeat the transcription process with different internal settings.
If you think background noise is the reason for the longer processing times, you can try SpeechPulse in a quieter environment and see if it can solve the issue.
How to control capitalization and spacing in the manual punctuation mode?
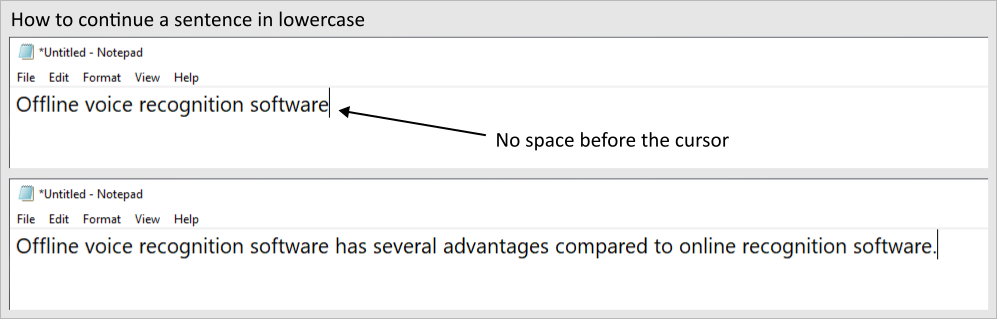
SpeechPulse automatically capitalizes the first character of a sentence. It considers the dictated text as a new sentence if the character before the current cursor position is a sentence ending character (.?!), if the cursor is at the beginning of a line, or if the previous character is a whitespace character (space, tab).
If you want to continue a sentence, you can place the cursor right after the last word with no space in between. SpeechPulse will then automatically insert a space before the next dictated text segment and continue the sentence without capitalizing the first letter.
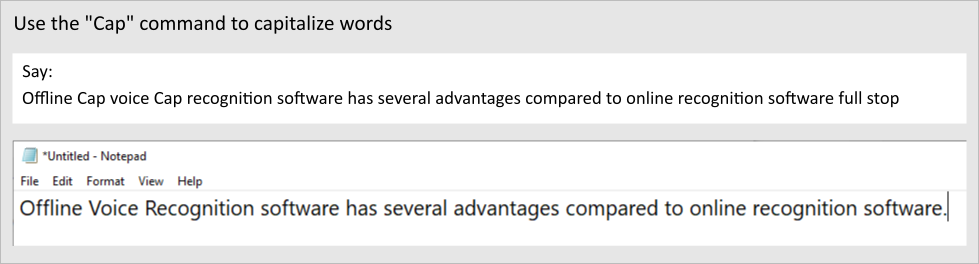
You can also manually control the capitalization using "Cap", "No cap", and "All cap" commands.
"Cap" command:
"No cap" command:

"All cap" command:

When you continue a sentence, SpeechPulse automatically inserts a space before the next dictated text segment. You can say "No space" before dictating the next text segment to prevent adding a space. The "No space" command works only at the start of a dictated segment.
How to fix automatic capitalization and spacing?
If automatic capitalization and spacing don't work properly, it can be due to incorrect key bindings on your PC.
SpeechPulse uses the hotkeys "CTRL+C", "CTRL+V", "SHIFT+Left", and "SHIFT+Right" to detect the previous/next characters on the text input area (e.g. Notepad). So make sure those hotkeys have their default meaning on your PC.
How to fix the missing SpeechPulse taskbar icon on Windows?
SpeechPulse minimizes to the system tray on Windows when background loading is enabled in "Settings->Options->General Settings".
However, some Windows taskbar configuration settings can hide the system tray icons of non-default apps.
You can display the hidden icons as explained here.